Zoeken
Assortiment
Opgeslagen golfspullen
Het GVB examen Oefenen?
<< Terug
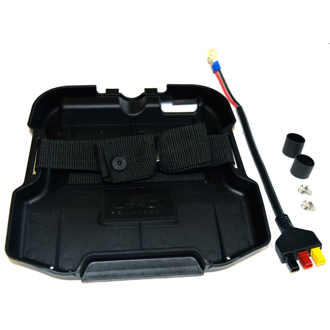 |
Powakaddy extended plug and play conversion kit | |||
| Step1: Take the extended battery lead which has the yellow red black Anderson poles over moulded and then bend both the black & red power lead round terminals so they are both at right angles to the power lead and will sit down on top of the battery connections more easily. place each of the heat shrink tubes over the round terminals as these will be needed to cover the terminals when tightened.Step2: Take the screw bolt with the spring washer directly under the screw bolts head then the flat washer and with the black round terminal over the battery screw terminal place the screw bolt through and tighten sufficiently. Do exactly the same with the red power cable and round terminal.Step3: Once you have made sure that the red cable terminal is tightened to the positive/red terminal of the battery and the black power cable is tightened to the negative/black terminal then place the heat shrink over each screw belt/terminal and then using a heat gun shrink the heat shrink tube down until it fits "snugly" over each terminal.Step4: Fully erect your PK trolley select the extended battery tray and you will see that in one corner there is an opening that will when the tray is fitted into your trolleyscurrent battery tray allow the extended batteries battery lead to push into. It is very important that when you fit your extended battery tray that you apply enough finger/hand force to fully push down the tray and also make sure that the two lugs of the tray are fully covered by the trolleys release button which held your standard plug & play battery this will then make sure that the tray is held firmly in position. Please always use the webbing strap to hold your extended battery firmly in place over rough terrain or up and down slopes etc. Merk: PowaKaddy |
||||
|
||||
